![pic8xUr5W[1]](https://shouball.com/wp-content/uploads/2013/12/pic8xUr5W1-678x381.jpg)

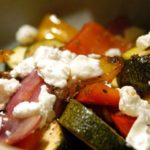
Grilled Vegetables with Feta
If you're like most people, you plant a few zucchini, yellow squash (crookneck or straightneck) and a few peppers... and then you have squash coming out your ears. The first week you eat it. Then you give it away. Then people run when they see you coming with more squash. Here's a really simple recipe to turn that excess squash into a gourmet side dish that you can server to the family or a dinner party. Snobs, food-trendies and crunchy-granola types will all like this, as grilled vegetables, particularly squash, is the latest trend at gourmet restaurants, AND it is healthy, low-fat, low calorie, natural, can be made from organic, sustainably-raised veggies and is also VERY tasty. Here's how to do it, complete instructions in easy steps and completely illustrated. The squash will taste MUCH better than anything you've ever had from a store.
Ingredients
- Fresh summer squash - 3 or 4 small yellow squash and 2 small green zucchini but you can use make larger batches. You want young squash! When it gets big to the point where seeds are forming, summer squash become tough and are more suitable for making zucchini bread or use in hand-to-hand combat. I figure one medium sized squash per serving (it does cook down) * 2 or 3 large onions * 2 or 3 fresh red, yellow or orange Peppers (sweet, Bell-type work best) * Extra-Virgin olive oil (about 1/4 cup) * 1/4 cup crumbled feta cheese * Herbs: o 2 tablespoons finely diced dried oregano and o 2 tablespoons of "Herbs d'Provence" - if you haven't got this, ground rosemary and thyme will do. * Outdoor grill or barbecue - OR - indoor oven (electric or gas - with a broiler element) * 1 sharp knife * If you want to freeze it, you'll also need vacuum food sealer or "ziploc" type freezer bags (the freezer bag version is heavier and protects better against freezer burn.
Instructions
-
Step 1 - Get the veggies! Start with fresh squash - as fresh and young as you can get. If there is a delay between harvesting and freezing, put it in the refrigerator or put ice on it. Harvest before the seeds become mature and when color is still uniformly dark Step 2 - Wash the squash! I'm sure you can figure out how to rinse the squash in plain cold or lukewarm water. Step 3 - Slice the squash and onions Just take a sharp knife and cut of both ends - blossom and stem end (cut about 1/4 of an inch, or half the width of an average woman's little finger) Slice into 1/8th inch thick slices. Prepare quickly, (if you leave it sit cut for more than a half hour, it will start to discolor). Do enough squash for one blanching at a time. Step 4 - Prepare the peppers Similarly, you'll need to remove the stem end of the peppers, and wash out the seeds from the inside (seed cavity) of the peppers, then slice into 1/8th inch thick slices. Step 5 - Marinate in olive oil and herbs Put the slices squash, peppers and onions in a bowl. Add the 1/4 cup of extra virgin olive oil and the herbs (2 tablespoons of each oregano and herbs d'Provence). Mix well and let stand for at least 10 to 15 minutes. 30 minutes is perfect. Step 6 - Grill the veggies - 10 minutes each side I use one of those stainless steel trays or baskets, to keep the veggies from sliding through the grill. Given them about 5 to 15 minutes per side - it really depends upon how hot your grill is. At 400F, it's about 10 minutes per side, until you see some golden brown appearing on the veggies. Step 7 - Remove from the grill and mix with feta Just pop the grilled vegetables back into the bowl they were in (it's not meat, so there's no bacteria to worry about) and mix well with the 1/4 cup crumbled finely feta cheese. Do this while the veggies are still hot, so the cheese will melt a bit! Step 8 - Serve - or Freeze! Serve them to your guests, or freeze it for the winter. I love the FoodSavers (see this page for more information) with their vacuum sealing! I am not paid by them, but these things really work. If you don't have one, ziploc bags work, too, but it is hard to get as much air out of the bags. remove the air to prevent drying and freezer burn. TIP: If you don't own a vacuum food sealer to freeze foods, place food in a Ziploc bags, zip the top shut but leave enough space to insert the tip of a soda straw. When straw is in place, remove air by sucking the air out. To remove straw, press straw closed where inserted and finish pressing the bag closed as you remove straw. Note: If the squash is very wet, after draining it, just put it in the food saver bag and freeze it (unsealed and upright) in your freezer. THEN, several hours later or the next day, when it is frozen, you can seal it with no mess! Step 9 - Done! Pop them into the freezer, on the quick freeze shelf, if you have one! Ziploc bag Foodsaver vac bag

Leave a Reply
You must be logged in to post a comment.